Friday, January 10, 2014

Baby Quilts

Last year I had two friends have babies. I had never made a quilt before, but it was on my 2013 resolution list to make one top to bottom. So, I made two.


The first was a Jelly Roll Race Quilt. I got a jelly roll of a really cute line from Riley Blake called "Saddle Up" and I used the girly colorways from it and then mixed in some Kona solids to break it up and add to it. I didn't do any sashing because I didn't know how yet, but I think it turned out ok anyway.

I used a Denyse Schmidt that I got at Jo-Ann's for the back and I just did some straight line quilting to add some bulk to it. This was the first time I used my walking foot, too. I used pre-fab quilt binding and hated it so now I only make my own binding.


I also added a little label that I made from grosgrain ribbon and fabric ink and stamps.

The second quilt I made was from a pattern called On The Boardwalk by It's Sew Emma. My cousin used it for her niece's quilt and I loved it so much I asked for some help to make one for my longest friend's first baby.

The fabric I used was a FQ stack of the Mo Willems' Don't Let the Pigeon Drive the Bus (from the Fat Quarter Shop - love them!). My friend and I are big readers and baby E is going to be too. This is one of my favorite children's stories so I jumped at the chance to use the fabric. (My mom gave the book at the shower so she got a bag with the quilt, its pillows, and books.)

I used the multi panel from the stack for the backing - it was a tight squeeze, but I was determined to make it work. I did straight line quilting long the boxes on the front and bound it with a dot print (by whom, I now forget).

Along with the fabric was a panel that had two pillows and a hand puppet. I made them all pillows, though. I used some of the leftover fabric from that panel for one of the pieces on the front. (Thanks to my girl Yvette for helping me with all the cutting - I never would have finished it!)


So, there you have it. Two baby quilts done. I'll do another post about my Lorax Quilt and the one that I've got in the works now. I also did a tshirt quilt (which, coincidentally, is the largest quilt I've ever made) so I'll post about that one too.


Monday, January 28, 2013

Petty Cash Stash Bash

I know it's been forever since we've blogged here. Life got crazy and we just went with the flow! We're both hoping to get back into the swing of things after our little 'vacation' and to get things started I'm going to share a little project I worked on this weekend.
 
My coworker and I were using a plain envelope for our petty cash and it was terrible at holding the change, so I told her I'd make a little zip pouch and embroider 'petty cash' on the outside. She didn't think I'd actually do it, but I did. So here's a little bag for our petty cash stash.

I used fabrics that were in my fabric stash, a zipper that was given to me by a friend, and I used two different fonts for the embroidery. I used a stem stitch for 'petty' and a whip stitch for 'cash.' This was the first time I did a whip stitch that much and I think it turned out well!
The bag is just a simple zip pouch, but I really need to look at those tutorials for better zipper corners - mine are terrible! Oh well, it serves its purpose. :)

Have a great week!!

Foxy Boxy Pouch - qayg

This is one of my very favorite things that I've made for myself lately. (If you follow us on instagram @brandiscardina & @meigheyburn you'll see all kinds of things we make for ourselves and others - including some sneak peeks!)  I put this on my personal blog this weekend, but wanted to post here, too!

You may remember this pouch I made to put my notary supplies in, I loved it but not enough.

It was my first attempt using a zipper and I found this AWESOMEST FABRIC IN THE WORLD that I wanted to use for that very same purpose. I also found a fat quarter stack at my very favorite (not-quite-so-local) quilt shop. Thankfully, it was in their Etsy store so I could snag it for myself! And since I would be visiting soon, my lovely cousin picked it up for me (she really is the best) and saved me some shipping and got an excuse to wander into the loveliness that is Crimson Tate :: Modern Quilter.

Photo courtesy of Julia Rothman's website: www.juliarothman.com 
(Dear Julia Rothman: you captured the essence of my daily grind and made it pretty. THANK YOU.)

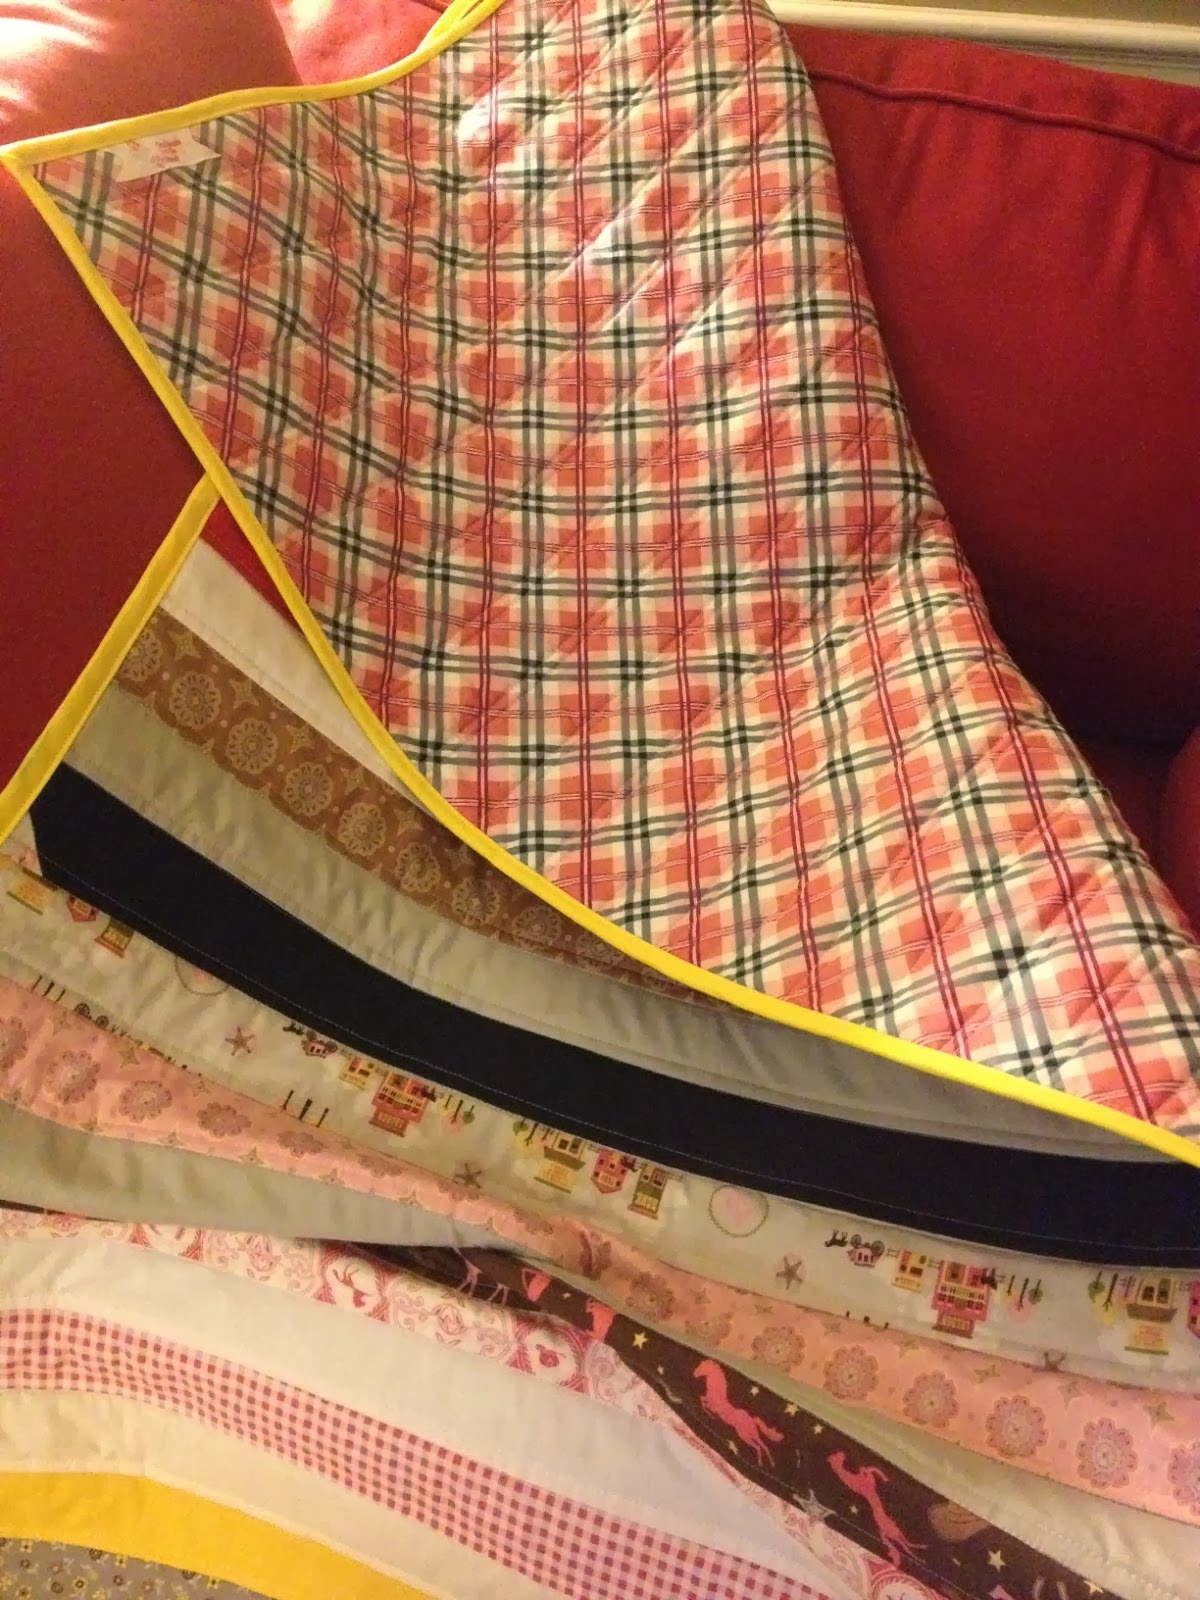
Anywho, since I made up those awesome stockings for Christmas (that I'll blog about later - promise!) I have been obsessed with the quilt as you go (qayg) technique. Thanks Rachael!


I pulled some choice cuts and used fusible fleece for interfacing, which with a bag this size made turning a bit cumbersome, but I love the way it holds shape so well. I used a tutorial from Pretty Modern.


This bag is PERFECTION. My seal and stamp fit in it just perfectly, and being a legal assistant, every day I use paper clips, a typewriter (well, maybe not every day, but we do actually still use a typewriter and a fax machine - old school, baby), pens, and now...glasses. Yep, I've had to get glasses. Oh well.

ALL THE PAPERCLIPS! I die. I love this fabric so much!!


So, there you have it. My new notary supply boxy pouch. SQUEE!!


Happy crafting, lovelies!! :)


Tuesday, October 16, 2012

Dollar Store Halloween Coaster Tutorial

I love fast and fun crafts. My life is a little crazy sometimes so I might only get 15 minutes of craft time in little bursts. This is something I made that took about 5 minutes!

Family Dollar has these coasters for $1 and greeting cards for $1. I had the Mod Podge on hand so this project cost me only $2.


First I decided which part of the card I wanted to show on my coaster.


I laid my coaster on top of my card and used a craft knife to cut around it. You want to cut it a tiny bit smaller than your coaster so that you don't have part of your card hanging off. You want it to cover just the top of your coaster.

                             
                                         Put a thin layer of Mod Podge on the tile.


Place your card on top and add another layer of Mod Podge. I let that dry a day and put another coat on again. Done!


I sent this with a few other goodies to my swap partner.

I hope you like this quick, cheap, and fun craft. I see more of these in my future : )


linking up here:

Friday, October 12, 2012

What you got in your pouch?

Brandi and I have made a bunch of these pouches. It seems like when one of us finds a good thing, we both make at least one and then probably more than that. That is just one of the benefits to being in business and sewing with your best friend - you can find things you know they would like and that you like too and check out the different spins you each put on them (check out our purse we made a bunch of, too).

In this case, it's the open wide zipper pouch from the Noodlehead tutorial. Have you seen her site? It's AWESOME. We love all her tutorials and patterns (I got a 241 tote in a swap I recently participated in).

Ok, enough jibber-jabber, on to the good stuff:

First: two of my friends were going on a cruise so I wanted to make them some travel pouches. Aimee LOVES Halloween so I picked two really cool prints and alternated them (the b&w is sparkly!).


Her housemate likes damask prints and really classy prints so I made these two for Jo.


My brother, sister, dad, and I all went in to get my mom a new sewing machine for her birthday and Brandi made her this bee pouch to go along with the gift. My mom *loves* The Secret Life of Bees and ever since that book came out, we've always gotten her bee things. :)


Here is the one I made myself for my notarial supplies from the tube map fabric & lemony dots.


And finally, the awesome 'Mrs.' one that Brandi made for her friend at work who got married.


Have you made any of these? Show us what you've got!


Thursday, October 11, 2012

Vintage Sheets turned Stylish Dresses

We have a very loyal customer who has had us make her two dresses from sheets before and asked for two more. This time I used a simple pattern for the one (same as this one that Brandi made) and made up a pattern for the other using her measurements and what she wanted it to look like.

We were going to take pictures outside and then drink wine, but we accidentally did things in the reverse order so it was too dark for outside pictures - so this is what we've got. :) Plus, we were being goofy.


This is the same customer who won the basket of goodies that we donated to my church for the missions auction. We were raising money to be used for the church mission work (both within and without, including the group I visit Mexico with each year) and Brandi and I donated a basket for the auction. She was determined to take it home. Now THAT is dedication! :)

I hope you're having a great week!


Wednesday, October 10, 2012

Accidental Hooded Cowel

Originally this was going to be a hoodie for Julie but since she was sleeping while I was sewing I couldn't try t on as I went. I was using one of her store bought shirts as a pattern and I made the sleeves too tight.


Instead of just scrapping the whole thing I turned it into a hooded cowel. Perfect!


It got me thinking, I bet if she had a hoodie she has grown out of I could easily make one of these with it to get a little more life out of it.


I trimmed it with lace and she loves it and that makes me happy. We got her new coat at Old Navy over the weekend, they had a sale it was only $15!


I love this owl fabric so much I wish I had gotten more. It is from Joann's and its soft stretchy knit.

Today I am linking up here: